My husband and I moved into our first apartment four months ago. One of the challenges we faced moving in together was finding foods we both liked. We grew up eating different things, so figuring out what we BOTH liked was going to take time.The first week or so I cooked things I knew. But when we decided to start trying new recipes, we went online. We had pretty decent luck with picking out good ones. But four months later, it’s hard to keep track of which recipes we tried and loved as opposed to the ones we tried and hated. My family and friends had made us a recipe book and gave it to me at one of my bridal showers. I thought about just adding to it. But the shelf it sits on its too tall for my tiny little legs. And after talking about it, we decided we wanted a place to keep only the recipes that had made the cut. We would keep the recipes we wanted to try in the book, but find a new home for ones we had tested out.
This brings us to the recipe box. I looked everywhere for a cute recipe box and recipe cards. I couldn’t find anything I liked. After months of searching I finally found something appealing on an Etsy page. But like most things on Etsy, I couldn’t justify paying the price they were asking, when I could make something similar for much less. I made this box for under $20, as opposed to the $50 plus shipping I would have had to pay. And you can to!
 Supplies:
- Recipe Box
- Paint
- Decorative Flowers
- Craft Rope
- Hot Glue Gun
- Scissors (not pictured)
**You can find all of these supplies at Michael’s craft store. The box was $4.99. You can get different flowers in a range of prices from $2.99-$8.99. I went when they were on sale. The craft rope I picked was $3.99, but there are also different sizes and colors to choose from, and they range in price as well.**
Instructions:
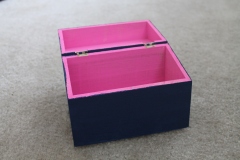 Paint your box the color or colors you prefer. I painted the inside of my box pink and the outside navy blue. You can paint the whole thing the same color, it is really up to you. This type of wood absorbs the paint, so be prepared to paint several layers to get a good, vibrant color. Also, be sure to give your box ample time to dry before the next step.
- Wrap the craft rope around the bottom part of the box, gluing as you go. You will want to be sure that you are wrapping tightly, otherwise it may unravel. Also, make sure you keep the craft rope touching so you can’t see the paint through it. You want it to be one big, uninterrupted area of craft rope.
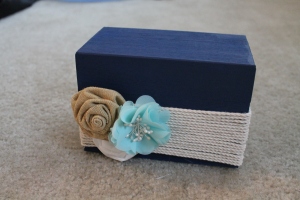 Glue your decorative flowers onto the craft rope. For best results, use three different flowers. Place your flowers in a group together. (Obviously, this is your box so if you want to use more or less that choice is up to you.) If you find their are twist ties on the back the flowers you will want to cut them off so the flowers will sit flat.


For instructions on how to make recipe card dividers, click here.

