Thanksgiving Box

Thanksgiving is an amazing holiday. For starters, I love to eat. The thought of an entire holiday devoted to eating as much turkey and mashed potatoes you can, is amazing. But of course thats not all it’s about. When I think back on all of most memorable Thanksgivings, I don’t remember all the food. I know I ate it obviously, but it’s not what I remember. I remember being surrounded by my family. I remember laughing at the kids table with my cousins. I remember listening to Grandma and Dad playing the piano. And now that my lifestyle keeps me from being able to go home for Thanksgiving, I truly understand how thankful I am for those memories. I wish I completely grasped that when I was growing up, but I never thought those times would end. As a kid, it isn’t always as easy to see.

So this year, I decided to do an activity with the children I watch. The idea of this activity is to get the kids to think about what they are thankful for each day in November.

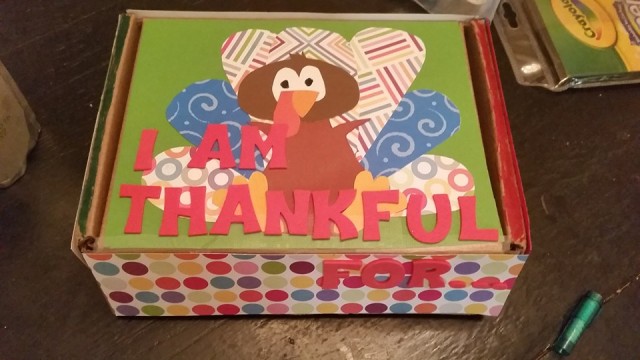
We started by making a Thanksgiving Box. 

10984293_1556138211308182_1433379490033133186_n

To make your own Thanksgiving Box you will need:

  • A Small Card Board Box
  • Card Stock or Construction Paper
  • Markers
  • Scissors
  • Glue
  • Letter Stickers (optional)

Start by covering the outside of your box with card stock or construction paper. I let Anna Kate pick out the paper (color or pattern) and I cut it to size and glued it to the box. Next, she took markers and colored in all the placed we couldn’t glue paper. Then we put together a little turkey. She helped draw the eyes and picked out the “perfect feathers” for our little thanksgiving friend. Once that was all secure, we used foam-letter stickers and spelled out “I Am Thankful For…” It was a great chance for her to practice her letter recognition and spelling. Once the outside was finished, she set out to decorate the inside. She spelled out “Happy Thanksgiving” with more stickers and drew things that reminded her of Thanksgiving. For her, that was a cooked turkey, a bowl of peas, a scarecrow, a pumpkins, and a batch of straw.

Next we started on what would go inside the box. We have been calling them the “Thankful Turkeys”. 

12196133_1556138224641514_2166723156716453732_n

To make these “Thankful Turkeys” you will need:

  • A Variety of Card Stock or Construction Paper
  • Markers
  • Scissors

As you can see, you don’t need much because you will be making these everyday. The actual turkeys are not what makes this project special, but instead what they write on them. Everyday, have the children trace one of their hands and decorate it to make a hand turkey. I gave the children as little direction on that as possible. I don’t like to give them examples so they don’t just copy my ideas. I like to leave the creative liberties in their hands.

Once they have completed their hand turkey for the day, have them write one thing they are thankful for and the date in the center of the turkey. Each day, have them complete one turkey and place it into the box. Since I don’t watch the kids over the weekend, and there are some days when they have extracurriculars, some days they have to make more than one. Brooks doesn’t enjoy making them as much, but the things he chooses to write are very entertaining. What he writes usually makes up for the rushed, “chubby fingered” turkeys he makes.

Not only do the children have to think about things they are thankful for each day, but by Thanksgiving Day they will have a box full of things they are thankful for. Anna Kate is so excited to be able to share these things with her parents, that she actually hides the box each day when I leave.

I have been amazed at some of the things the kids have told me they are thankful for. The first few were fairly obvious. They both chose family, friend, and God in no order for the first three days.  After that it got pretty unpredictable. They have said everything from “cheese” to “Auburn”. They have also taught me a lot about thankfulness. Again, I tried not to offer up too many examples so they would tell me what THEY were thankful for. After they finished naming off family and friends, they started to name off things that I take for granted in day to day life, like water and shelter. I found it amazing that at their age, they thought about being thankful for things like that. Things that I don’t even think to be thankful for now that I am paying for them.

Since we still have a couple of weeks before Thanksgiving, we still have quite a few more turkeys to make. But I have enjoyed this project so far. There are a lot of ways to personalize this project to fit you and the little ones in your life. You could also do this project as a family or as an adult. Instead of drawing on turkeys, you could simply write what you are thankful for on a sheet of paper, everyday for the month. It would be a great thing to look back at on Thanksgiving day with the ones you love. I can’t wait to see what everyone comes up with! Happy Thanksgiving, All!

alyssa

DIY Belle and Gaston Costumes

wpid-wp-1446312895124.jpegHappy Halloween Everyone! I hope everyone is having a SPOOK-tacular day!

This morning, my four-legged side kick and I decided to go to the Broadway Paw-rade in Uptown Columbus. There were over a hundred dogs, and most of them were dressed up! It was a lot of fun. If you know me, even a little, you know I wouldn’t miss a chance to dress up with my fur baby. Koda Bear and I went as Belle and Gaston!

I put together both costumes for under $15. I’m actually quite impressed with how easily it all came together. Since we just got back from Disney World, I wasn’t wanting to spend too much. But I was also very inspired to keep my Disney outfits going strong.

But here’s what you need to pull it off!

Belle:

  1. Blue Dress – Plato’s Closet – $1 (on sale)
  2. Blue Ribbon – Michael’s – $3
  3. White Button-Up – Goodwill – $3
  4. 2 Yards White Fabric (for apron) – Previously Owned
  5. Black Flats – Previously Owned
  6. White Cami – Previously Owned – Optional
  7. Basket – Goodwill – $1
  8. Book – Previously Owned

**The Blue dress was the hardest thing to find. You want to find a dress that has a very basic shape. Its best to look for one with a tank top style top and a flare style bottom. My dress had lace already sewed in the bottom. You can add that if you like it.

Style It:

Start by putting on the white top. Button it up, but leave the top open. If your button-up shirt has pockets, you may want to put a white cami over it to smooth it out. Other wise you’ll be able to see the pocket lines through the dress. Put the dress on over the white shirt. Finish your outfit with your apron and black flats. Put your hair up. I twisted my bangs back and tied them up. Then I put the rest of my hair in a ponytail and added the ribbon.

If you need to make your apron, lay your dress down and decided how big you need it to be. Remember you will want it to be shorter then your dress. Cut out the size square you need and sew that square to a long strip of fabric you will use to tie it onto your waist. I used two layers of fabric because it was a little see-through. You may not need to.

Gaston:

**Disclaimer** This costume was intended for a dog, but you are essentially making a shirt. Although I would style a person different than a dog, but this costume would work for a person as well. 

  1. Red Polo – Goodwill – $3
  2. 2 Sheets of Yellow Felt – Michael’s -$1
  3. Brown Fabric – Previously Owned
  4. Hot Glue Gun and Glue

Make It:

Cut out sheets of yellow felt and glue them to the collar of the polo. Cut two strips of brown fabric for his belt. Glue them on the shirt. Cut out a buckle out of the left over yellow felt and glue it on. You could sew all of this on if you wanted, but I didn’t want to spend much time making something I wasn’t sure Koda would actually wear. I was afraid he would rip it up, but he wore it all morning and didn’t try to get it off once. I did have to safety pin it up some so he wouldn’t step on it. I only pinned up a couple of inches.

If you wanted to be Gaston, you could make this shirt for yourself. If it were me, personally, I would attach the yellow felt on the collar. Then I would wear an actual belt over it. I would pair it with brown or black pants or leggings and black boots. You could also accessorize with a bow and arrow.

I can’t wait to see what you come up with!

Good luck and Happy Halloween!

alyssa

Once Upon My Fairy Tale is now on Facebook!

NicetomeetchaHappy Thursday everyone! I decided to make a Facebook Page for everything Once Upon My Fairy Tale!!! Feel free to give it a like if you’re on Facebook and want up to the minute updates on my ever-changing adventures!

Once Upon My Fairy Tale’s Facebook Page

And don’t forget to follow us on Pinterest!

Once Upon My Fairy Tale’s Pinterest Page

Thanks a million! Check back for lots of new Disney, DIY, and Halloween post coming soon!

alyssa

Ranger School Craft Challenge

When Zac left for Ranger School, I had no idea how I was going to occupy my time. I had a part time job, two fur babies and a whole lot of free time. We talked about all of the things I COULD do to fill my time, like working out, trying to make friends, or trying new recipes. And although I ended up doing all of those things, at the time the only idea we came up with that I thought I would stick to was a craft challenge.

The challenge was simple. For every week Zac was away, I had to complete at least one project and blog about it. In the end, he was gone for 13 weeks and I completed over 13 projects. There were a couple weeks I didn’t blog about my project because I didn’t want Zac to see it online before he saw it in person.

This challenge started as a way for me to fill time, but by the end of the 13 weeks, I had to find time to complete each project. I stepped out of my comfort zones and made friends, started going to the gym, and trying new things. When it was all said and done, this challenge jumpstarted my own “Ranger School” journey. I have changed and grown so much since the day I dropped Zac off. I did so much more than just wait for him to come home.

Well here it is! All the projects I completed in 13 weeks!

Ranger School Craft Challenge

Week One: Patriotic 4th of July Wreath

IMG_0440

Week Two: Travel Globe

IMG_0481

Week Three: Open When Letters & Batman Care Package

IMG_0484IMG_0664

Week Four: Office Chair Makeover

IMG_0766

Week Five: Rolodex Makeover

IMG_0500

Week Six: Keepsake Treasure Box Makeover

IMG_0732

Week Seven: Anniversary Care Package

wpid-wp-1440963912696.jpeg

Week Eight: Paper Anniversary Gift 

wpid-wp-1443104980800.jpeg

Week Nine: Olaf Painting

wpid-wp-1443013714731.jpeg

Week Ten: Hawaii Care Package

wpid-wp-1441144587620.jpeg

Week Eleven: Ribbon and Lace American Flag

wpid-wp-1440897979325.jpeg

Week Twelve: Anniversary Date Wall Hanging

wpid-wp-1438479121872.jpeg

Week Thirteen: Belle Dress & Beast Sign

wpid-wp-1443008426382.jpeg

I am so glad I decided to do this. Not only did it give me something to do, it gave me something to talk to people about on the Ranger School Support groups. It made reaching out to make friends a little bit easier. And once I made those friends I found myself stepping out of my comfort zone and trying new foods, going to the gym, and eventually jump starting a new lifestyle. This challenge helped get me out of a funk that came from being in a new place by myself and now I feel completely at home. And completing a weekly craft or project has almost become a habit of mine now. I have several other projects in the works and I can’t wait to share them with you!

lyssa

Paper Anniversary Gift

IMG (432)One month ago, my husband and I celebrated our one year wedding anniversary. As most of you probably know, the first anniversary is the “paper anniversary”. Because Zac was in Ranger School, we spent our special day apart. We had to wait until his first graduation pass to exchange gifts. Zac had limited resources to gifts while in Ranger School, yet he still managed to knock it out of the park. He wrote an amazingly heartfelt poem and read it to me when he got home.

I however, had ALL the time in the world to work on my gift since I didn’t have to worry about him coming home and seeing me working on it, so I knew mine would have to be good. I completed his gift as one of my weekly projects but didn’t post it because I wanted him to see it in person before he saw it on social media.

Here’s what I came up with:

image

Supplies:

  • Large Piece of Sturdy Paper (I used poster board)
  • Large Piece of Sturdy Paper in Contrasting Color
  • Frame
  • Spray Paint (optional)
  • Staple Gun and Staples
  • X-acto Knife
  • Mod Podge

Directions:

  1. Choose a picture to work from.
  2. Draw (or trace if you don’t think you can draw) the picture to the size you want on your darker colored paper (I used black paper). If you want a large picture and you feel the need to trace it, you will need to blow the picture up in order to do so.wpid-wp-1442941649974.jpeg
  3. Cut the lighter piece of paper to fit in or behind your frame.
  4. Using an X-acto knife, cut around the outside edges of the subjects of your picture. Since my picture was a wedding picture, I also decided to cut out all of the white accents, such as: my dress, my veil, my tiara, Zac’s bow tie and parts of his tux.wpid-wp-1442941635639.jpeg
  5. Once you have all the pieces cut away, glue the darker piece of paper to the lighter piece using the Mod Podge. (Be careful about dragging the glue across the darker paper, it may smear.)
  6. Let dry.
  7. Once dry, insert into frame. I didn’t use a traditional frame with glass, so I stapled the paper to the frame with a staple gun.

I worked long and hard on that gift. I cut until my fingers hurt. So i was extremely happy when Zac loved it enough to want to hang it in our bedroom where we would see it every night. I thought I chose a gift that fit the “paper” theme that hadn’t be over used or too terribly common. I guess I better start figuring out how I’m gonna top that for next year!

lyssa

DIY Bam Bam and Pebbles Costumes

1900117_10152370685432617_3365013254769095359_nSince Halloween is right around the corner, I figured I would share the costumes I made for my husband and I last year. We didn’t have a lot of time to pull these costumes together, but I think they turned out pretty well.

Supplies:

For Bam Bam:

  • Orange Fabric
  • An Orange Hat
  • Brown Fabric
  • Safety Pins
  • A Small Dog Bone
  • A Medium Sized Dog Bone
  • Black Felt
  • Hot Glue
  • Scissors
  • Cave Man Club

**We found the plain orange hat at a hat store that custom embroiders hats. We found the Cave Man Club at Spirit Halloween. The Bones are all Nylabone bones. You can get them at WalMart,Target, Meijer, and Petsmart.

For Pebbles:

  • Green Tank Top
  • Light Blue Body Con Skirt (or blue shorts)
  • Black Felt
  • Medium Sized Dog Bone
  • Hot Glue
  • Scissors

Directions:

For Bam Bam:

  1. Start by measuring around the waist of the person who is going to be wearing the costume. Then have them measure how long they want their costume to be. Keep in mind that you will be cutting pieces off, so be sure to find out how long it needs to be for them to be comfortable.
  2. Next cut triangular shapes out of the orange fabric.
  3. Have the wearer tie the fabric around their waist where they want to wear it.
  4. Measure from the front left hip bone, over the shoulder to the right side of the lower back. Add about two inches and cut out a strip of brown fabric. Cut triangular shapes out of the brown fabric.
  5. Safety pin the brown fabric to the orange fabric. (Be sure to pin it so you can’t see the pin.) Hot glue the medium sized bone over the front safety pin.
  6. Cut out various sizes of triangles out of the black felt.
  7. Hot glue the black triangles all over the orange fabric.
  8. Cut out smaller triangles for the hat.
  9. Hot glue them all over the hat.
  10. Hot glue the small bone on the back of the hat.

For Pebbles:

  1. I found my green shirt at Plato’s Closet and ended up liking it too much to want to hot glue anything to it. So for mine, I cut triangles out of black felt that hat sticker backing. It didn’t really work as well as the hot glue, but it saved the shirt.
  2. Wear green shirt with blue skirt or shorts.
  3. Complete look buy wearing the last dog bone in your hair. I hot glued a bone to a hair thing.

It wasn’t the most difficult DIY i have ever done, but we were able to pull the two costumes together quickly and with very little money. I can’t wait to see what we come up with this year!

lyssa

Disney Themed Ranger School Homecoming

wpid-wp-1443008426382.jpegAnyone who knows us, knows that my husband and I love Beauty and the Beast. Sure, it was kinda my thing that morphed into our thing. But Zac grew to love it so much that Tale As Old As time was our wedding song, that he happily walked around Disney World wearing Beauty and the Beast Tank tops, and that we decorated our living room with a painting of the Beauty and the Beast stained glass window. Like a lot of things in our lives, it went from “my movie” to “our movie”.

While Zac was in Ranger School, I made him a book using pictures from the movie to try to make him laugh. The book suggested that Zac was the Beast, obviously, and that Ranger School was Gaston. There were pictures of Gaston attacking the Beast, pictures of Belle giving the Beast a stern “talking to”, and of course, pictures of the Beast defeating Gaston. This book was going to be given to Zac when he was on his bus ride back to Georgia from Florida, so I thought I would keep the Beauty and the Beast theme going when I went to pick him up.

wpid-wp-1442941679447.jpegFirst I made my version of a Disney Bound Belle dress. (I didn’t end up getting many pictures of just the dress on the day of because I was so excited to see Zac. But I did take one while I was working on my outfit.)

To make this Disney Bound, I found a plain, strapless yellow dress. It was not an easy thing to do at the end of summer. Most stores were transitioning to Fall clothing styles, so most yellows were mustardy tones that just wouldn’t cut it for me. Luckily, I had my crew of amazing friends helping me look. We found a ton of different styles of yellow dresses at Forever 21. I found a lot of really cute ones, that were actually way cuter than the one I bought. But I knew this particular dress would be perfect for what I wanted to do to it. Next, I went on the hunt for yellow tulle and buttons. Surprisingly, Hobby Lobby didn’t have ANY yellow tulle. They actually had every color BUT yellow. I did snag the rose and a red flower for my hair from Hobby Lobby though, so it didn’t end up being a wasted trip. Next I hit up JoAnn’s Fabric. I have had a lot of success with them lately, so I wasn’t too surprised when I found exactly what I needed. I did have to paint my buttons yellow, but that was a simple fix. I attached the tulle and buttons to my dress by hand, and ended up securing the buttons with hot glue so they would lay flat if I moved. My last added touch was finding red shoes. I found a really cute pair at Charlotte Ruse. wpid-wp-1442941698548.jpegUnfortunately, I have baby feet and they didn’t have my size. I ended up finding mine at Rue 21. There shoe sizes are a little strange so the closest I could get to “my size” was a S/M so they are a little bit big, but they got the job done.

Next I needed to make a sign. I knew showing up dressed as a Disney Princess could be potentially ridiculous, so I needed my sign to tie everything together. I decided to make it say “I’m here for my Beast.” Just to make sure there could be no doubt in anyones mind, I decided to draw the Beast on the sign too. I chose to draw him in his cape and angry so he’d be more masculine. I outlined everything and drew in stained glass throughout the outline.

Zac’s face when he saw me was exactly what I expected. A big ole’ smile and a goofy laugh. I know I could have shown up in sweat pants and he wouldn’t have cared but I was glad I did something silly. It gave me something to do and made him laugh before I even made it to him. And hey, now I can dress like Belle when ever I want to. I am NOT mad about that! 🙂

lyssa

Hawaiian Themed Care Package

My husband and I are lucky enough to be to be able to say that our first duty Station is Schofield Barracks, HI. Knowing that we are moving to Hawaii when this Ranger School journey is over, has made all the difference for me. It gives me something to plan and look forward to. Honestly its not something I feel like I need to explain; WE. ARE. PUMPED. So it was really a no brainer when I had to pick another care package theme.

wpid-wp-1441632255503.jpegSupplies:

  • Priority Mail Box
  • Card Stock
  • Letter Stickers
  • Decorative Stickers
  • Glue or Mod Podge
  • Scissors
  • Hawaiian Leis
  • Packing Tape

Directions:

  1. Construct your box using the packing tape.
  2. Use your card stock to cover every surface of the inside of your box. Some people leave the inner walls of the box uncovered. I prefer to cover it all so it looks uniform and complete.
  3. Using stickers write out: “Almost Time To Get Lei’d” on the top and bottom flap. I wanted to make the word Lei’d really large, so I cut it out of card stock myself. You should be able to find big letters at Hobby Lobby or Michael’s, I am just picky.
  4. Cut the lei’s and be careful not to lose any of the flowers, Tape around the inside of the box. You may want to tape in several places.
  5. Use decorative stickers to decorate the other two flaps.
  6. I added a Hawaiian bucket list to one flap that included all of the things we had talked about doing together when we got there. I hoped that might lift his spirits.

Remember, you know your solider better than anyone. Add as many personal touches as you can. Have fun with your package and she/he will see the love you put into it. I know my husband is going to crack up when he sees this.

** This care package was featured on the Creative Care Packages Instagram page.

lyssa

Anniversary Care Package

wpid-wp-1440963923295.jpegI some how forgot to post my last care package! I decided to make an Anniversary themed care package since he was supposed to receive the package only a few days before our first anniversary. I thought it would be fitting since I would have to use paper to decorate it. It turns out they held the package and he still hasn’t gotten to open it yet. But I know he is going to love it when he finally gets to open it! I used a lot of personal touches, like clips from our “thank you” cards, and pictures from the photo booth. Hobby Lobby has a large selection of wedding stickers. If you don’t want to spend the money on the stickers, you can always draw on the paper. I just like the extra touch the stickers give, and scrap booking supplies go on sale at Hobby Lobby all the time. Don’t forget to take your 40% coupon!

wpid-wp-1440963912696.jpegSupplies:

  • Priority Mail Box
  • Card Stock
  • Letter Stickers
  • Decorative Stickers
  • Glue or Mod Podge
  • Scissors
  • Photographs
  • Packing Tape


Directions:

  1. Use the packing tape to construct your box. Make sure its taped up extremely well if you are shipping to Swamps Phase of Ranger school. They have a serious ant problem.
  2. I chose card stock in the colors of our wedding, pink and navy blue. But you can choose any colors your solider will love. Glue or Mod Podge the card stock on the inside surfaces of your box.
  3. Use the stickers and photographs to decorate the box in a personal way your Solider will love!


Remember, no one knows your Solider like you do! Don’t be afraid to be cheesy, mushy, or just plain funny. You are supplying smiles and happy thoughts where they don’t come often! I can’t wait to see what you come up with! Happy Crafting!

lyssa

Ribbon and Lace American Flag

Living near an army base, in Georgia, everyone decorates with American Flags. We have them hanging both in and outside of our home. I decided I wanted something different to decorate with, so I began collecting ribbon. This project is very simple and easy to customize to your space or personality!

wpid-wp-1440877935084.jpegSupplies:

  • Wooden stick
  • White Paint
  • Various White Ribbons and Lace
  • Various Red Ribbons and Lace
  • Various Gold Ribbons and Lace
  • 1/2 a Yard Blue Star Fabric

Directions:

  1. Paint wooden stick white. Allow time to dry.
  2. Cut all the ribbons to a similar length. (to determine the length, you should measure where you are gonna hang it first)
  3. Staple the ribbons to the wooden stick, starting with red. There should be 13 sections of alternating red and white ribbons. Add gold in random places to add a flare. wpid-wp-1440877958571.jpeg
  4. Staple the fabric over the ribbon on the upper left side.
  5. Tie a neutral colored rope to the stick and staple it in place.
  6. Hang your master piece for all to see.

wpid-wp-1440897979325.jpegMy favorite thing about this project, is how each person’s flag could be completely different. There are countless types of ribbon, and endless stores to buy them from. Have fun with your flag and make it your own! I would love to see what you come up with!

lyssa